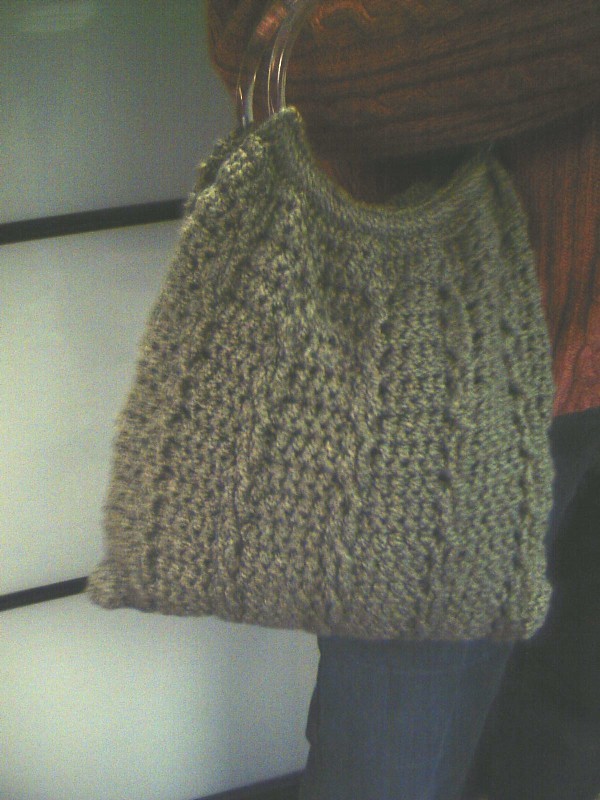

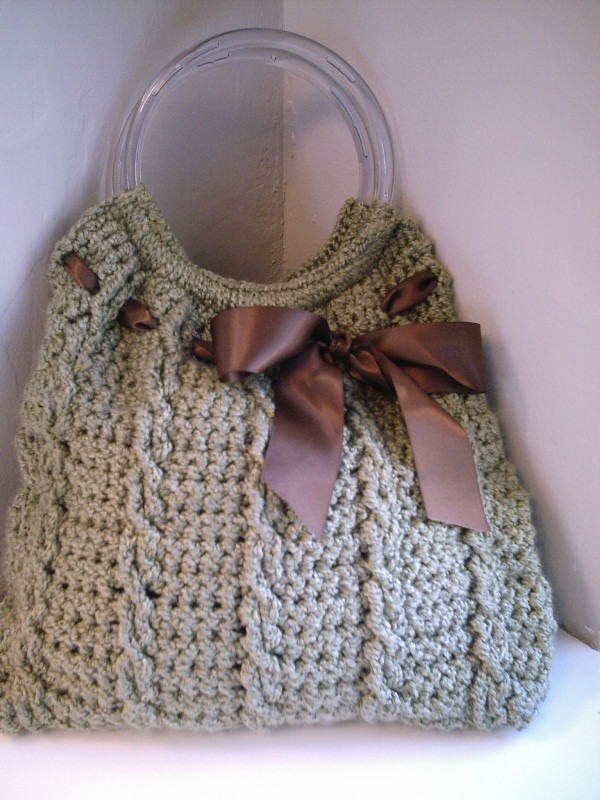
I finally found the brown ribbon to put on this purse for my friend Camille. It's similar to the smaller one I made earlier, but I used a cable-like stitch and love the way it turned out. I also like it with the flower pin.
PATTERN
Ch. 48 (multiple of 7 plus 6)
1. Right Side Row. Hdc in third ch from hook and in each remaining ch. Ch.1, turn.
2. And ALL Wrong Side Rows. Sc in each stitch across. Ch.2, turn.
3. *Work hdc in 4 sc, work post dc as follows: yo, insert hook right to left under post of hdc below next sc, draw up loop, (yo and draw through 2 loops) twice to complete dc. Skp sc behind post dc, work hdc in next sc, work post dc in hdc below next sc*, skip sc behind post dc; repeat from * to * across, ending with hdc in last 4 sc. Ch 1, turn.
4. Wrong side row, repeat row 2.
5. *Hdc in 4 sc, skip firt post dc, and work post dc on second post dc. Ch. 1, now work post dc around the skipped post dc (crossover made, skip the 3 sc behind crossover *; repeat from *to* across, ending with hdc in last 4 sc.
6. Wrong side row, repeat row 2.
7. * Hdc in 4 sc, work post dc in post dc below next sc (always skip sc behind each post dc), hdc in next sc, post dc in post dc below next sc*. Repeat from * to * ending with hdc in last 4 sc. Ch 1, turn. Repeat Rows 2 through 7 for pattern.
This looks awesome! Can I ask what kind of yarn and needle you used?
ReplyDeleteam I missing where/how to insert handles?
ReplyDeleteUsually to start these purses I crochet one handle on first s d then continue the pattern as noted. Then when I get to the other end I crochet that handle on. Then I sew up the side seams leaving about one inch at the top so you can easily remove items from the purse and open it wider
DeleteYea I was wondering about the handles as well....
ReplyDeletehow do I attach the sides and handles please
ReplyDeleteSame question as the rest (:
ReplyDeleteI made a purse similar to this one. In that pattern the handles had to be sewn in.
ReplyDeletealso need to know how to assemble the purse..is it worked in rounds or is it worked flat and sewn up the sides...any info would be helpful...I really want to make this my next project!
ReplyDeleteWhat size needle and yarn was used??
ReplyDeleteI used size H/8 hook and worsted medium 4 yarn. Makes a nice size purse. I'm crocheting one side, then the other and stitching them together. This is how I attach the handle(ring). With right side facing me, pull the hook and yarn from behind thru the inside of the ring. Put your hook in the first sc, pull up a loop into the ring and yo from behind and pull thru to make a sc. The single stitch should be laying on the edge inside the ring. I'm also adding a liner so small items don't fall thru the purse.
ReplyDeleteThis is beautiful! You did a great job. This would make a great gift.
ReplyDeleteCan anyone give a better pattern discription for me? More detailed would be awesome, since I'm using Easy Patterns. Like Row 2-12, hdc in each st....etc. If you think this is too advanced of a pattern, please let me know that also. Thanks.
ReplyDeleteThis pattern is in reverly.com
ReplyDeleteStill cannot get the stitch right and I have been crocheting for 70 yrs.
ReplyDeleteIs the pattrn free on riverly?
ReplyDeleteI'm working on this purse right now. I find that if you start with a hdc foundation row with 46 stitches, it makes for an easier time when adding a handle. Instead of using a round handle and sewing it on, I'm going to use a U-shaped handle and ad a row or two of decreases on the top to give it a rounder look at the top. I love this pattern!
ReplyDeletehow is the handle inserted or attached? what size needle did you all use? this is a cute pattern. would love to make it. thanks.
ReplyDeletehi, i m beginner in crocheting i dont understand wrong side of row can u plz explain it
ReplyDelete"Right side" means the outside of the purse, the side you will see. "Wrong side" refers to the inside of the purse, the part you don't see. In this pattern, it is the even numbered rows. Hope this helps
DeleteCould we have a link to the pattern or the name of it please.
ReplyDeleteHere's the Ravelry link:
ReplyDeletehttp://www.ravelry.com/patterns/library/camilles-purse
But it just leads you back here.
donna, what is the stitch called cross over fpost , i'm confused or cable stitch, would love to see you post a youtube tutorial on this pattern..
ReplyDeleteLovely bag !!
ReplyDeleteWant to make same. But finding the pattern little hard as a beginner.
Please help for getting row number 2, 5 and 7 with some more details.
Thanx.
Thank you so much for sharing this beautiful purse, I Have just finished one for my friend and it turned lovely!!
ReplyDeleteThank you for sharing your free pattern. I like the way it looks!
ReplyDeleteGreat purse I have some handles with Huming Birdes on them (hope I can use them.
ReplyDeleteThank you for the lovely pattern. How many rows did you make for your bag?
ReplyDeleteBeautiful bag. This will definitely be my next project. Thank you very much for sharing your pattern.
ReplyDeleteBeautiful bag. This will definitely be my next project. Thank you very much for sharing your pattern.
ReplyDeleteYes, I agree, lovely purse. But the instructions could be written better.
ReplyDeleteThank you so much for sharing your pattern for free! I look forward to trying the challenging Post DC :)
ReplyDeleteFor those of you who found the pattern difficult to read (so did I),
I copied it, enlarged the font and spaced it out more. You might find it easier to follow if you print it out. As all even rows are like Row 2, it did not bother to put that in.
Cable Stitch Pattern Bag crochet pattern by Donna from Knots and Loops
Ch. 48 (multiple of 7 plus 6)
Post DC (to be written as PDS from here:
YO, insert hook right to left under post of HDC below next SC, draw up loop, (YO and draw through 2 loops) twice to complete DC.
1. Right Side Row.
HDC in third ch from hook and in each remaining ch. Ch.1, turn.
2. And ALL Wrong Side Rows. SC in each stitch across. Ch.2, turn.
3. *Work HDC in 4 SC, work post dc (PDC) as follows:
Skip SC behind PDC, work HDC in next SC, work PDC in HDC below next SC*, skip sc behind PDC; repeat from * to * across, ending with HDC in last
4 SC. Ch 1, turn.
5. *HDC in 4 SC, skip first PDC, and work post DC on second PDC.
Ch. 1, now work PDC around the skipped PDC (crossover made, skip the 3 SC behind crossover *; repeat from *to* across, ending with HDC in last
4 SC.
7. * HDC in 4 SC, work PDC in PDC below next SC (always skip sc behind each post dc), HDC in next SC, PDC in PDC below next SC*. Repeat from * to * ending with HDC in last 4 SC. Ch 1, turn. Repeat Rows 2 through 7 for pattern.
Oh man.. I really need the tutorial in video so badly :`(
ReplyDelete